hikaricp
Introduction to HikariCP
1. Overview
In this introductory article, we’ll learn about the HikariCP JDBC connection pool project. This is a very lightweight (at roughly 130Kb) and lightning fast JDBC connection pooling framework developed by Brett Wooldridge around 2012.
2. Introduction
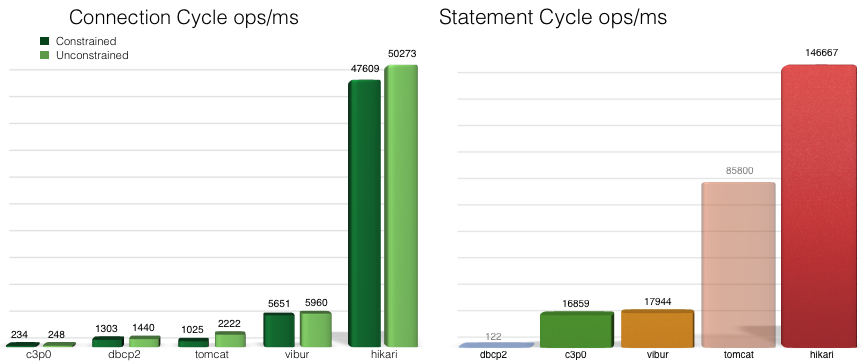
There are several benchmark results available to compare the performance of HikariCP with other connection pooling frameworks such as c3p0, dbcp2, tomcat, and vibur. For example, the HikariCP team published below benchmarks (original results available here):
The framework is so fast because the following techniques have been applied:
-
Bytecode-level engineering – some extreme bytecode level engineering (including assembly level native coding) has been done
-
Micro-optimizations – although barely measurable, these optimizations combined boost the overall performance
-
Intelligent use of the Collections framework – the ArrayList<Statement> was replaced with a custom class FastList that eliminates range checking and performs removal scans from tail to head
3. Maven Dependency
Let’s build a sample application to highlight its usage. HikariCP comes with the support for all the main versions of JVM. Each version requires its dependency; for Java 9 we have:
<dependency>
    <groupId>com.zaxxer</groupId>
    <artifactId>HikariCP-java9ea</artifactId>
    <version>2.6.1</version>
</dependency>
And for Java 8:
<dependency>
    <groupId>com.zaxxer</groupId>
    <artifactId>HikariCP</artifactId>
    <version>2.6.1</version>
</dependency>
Older JDK versions like 6 and 7 are also supported. The appropriate versions can be found here and here. Also, we can check the latest versions in the Central Maven Repository.
4. Usage
Let’s now create a demo application. Please note that we need to include a suitable JDBC driver class dependency in the pom.xml. If no dependencies are provided, the application will throw a ClassNotFoundException.
4.1. Creating a DataSource
public class DataSource {

    private static HikariConfig config = new HikariConfig();
    private static HikariDataSource ds;

    static {
        config.setJdbcUrl( "jdbc_url" );
        config.setUsername( "database_username" );
        config.setPassword( "database_password" );
        config.addDataSourceProperty( "cachePrepStmts" , "true" );
        config.addDataSourceProperty( "prepStmtCacheSize" , "250" );
        config.addDataSourceProperty( "prepStmtCacheSqlLimit" , "2048" );
        ds = new HikariDataSource( config );
    }

    private DataSource() {}

    public static Connection getConnection() throws SQLException {
        return ds.getConnection();
    }
}
Point to note here is the initialization in the static block.
HikariConfig is the configuration class used to initialize a data source. It comes with four well-known must-used parameters username, password, jdbcUrl, dataSourceClassName.
Out of jdbcUrl and dataSourceClassName, either one is to be used at a time. However, when using this property with older drivers, we may need to set both properties.
In addition to these properties, there are several other properties available that may not all be offered by other pooling frameworks:
-
autoCommit
-
connectionTimeout
-
idleTimeout
-
maxLifetime
-
connectionTestQuery
-
connectionInitSql
-
validationTimeout
-
maximumPoolSize
-
poolName
-
allowPoolSuspension
-
readOnly
-
transactionIsolation
-
leakDetectionThreshold
HikariCP stands out because of these database properties. It’s advanced enough to even detect connection leaks by itself!
A detailed description of these properties can be found here.
We can also initialize HikariConfig with a properties file placed in the resources directory:
private static HikariConfig config = new HikariConfig(
    "datasource.properties" );
The properties file should look something like this:
dataSourceClassName= //TBD
dataSource.user= //TBD
//other properties name should start with dataSource as shown above
We can use java.util.Properties-based configuration as well:
Properties props = new Properties();
props.setProperty( "dataSourceClassName" , //TBD );
props.setProperty( "dataSource.user" , //TBD );
//setter for other required properties
private static HikariConfig config = new HikariConfig( props );
Alternatively, we can initialize a data source directly:
ds.setJdbcUrl( //TBD  );
ds.setUsername( //TBD );
ds.setPassword( //TBD );
4.2. Using a Data Source
Now that we have defined the data source, we can use it to obtain a connection from the configured connection pool and perform JDBC related actions.
Suppose we have two table named dept and emp to simulate an employee-department use case. We will write a class to fetch those details from the database using HikariCP.
Below we list the SQL statements necessary to create the sample data:
create table dept(
  deptno numeric,
  dname  varchar(14),
  loc    varchar(13),
  constraint pk_dept primary key ( deptno )
);

create table emp(
  empno    numeric,
  ename    varchar(10),
  job      varchar(9),
  mgr      numeric,
  hiredate date,
  sal      numeric,
  comm     numeric,
  deptno   numeric,
  constraint pk_emp primary key ( empno ),
  constraint fk_deptno foreign key ( deptno ) references dept ( deptno )
);

insert into dept values( 10, 'ACCOUNTING', 'NEW YORK' );
insert into dept values( 20, 'RESEARCH', 'DALLAS' );
insert into dept values( 30, 'SALES', 'CHICAGO' );
insert into dept values( 40, 'OPERATIONS', 'BOSTON' );

insert into emp values(
 7839, 'KING', 'PRESIDENT', null,
 to_date( '17-11-1981' , 'dd-mm-yyyy' ),
 7698, null, 10
);
insert into emp values(
 7698, 'BLAKE', 'MANAGER', 7839,
 to_date( '1-5-1981' , 'dd-mm-yyyy' ),
 7782, null, 20
);
insert into emp values(
 7782, 'CLARK', 'MANAGER', 7839,
 to_date( '9-6-1981' , 'dd-mm-yyyy' ),
 7566, null, 30
);
insert into emp values(
 7566, 'JONES', 'MANAGER', 7839,
 to_date( '2-4-1981' , 'dd-mm-yyyy' ),
 7839, null, 40
);
Please note if we use some in-memory database such as H2, we need to automatically load the database script before running the actual code to fetch the data. Thankfully, H2 comes with an INIT parameter which can load the database script from classpath at runtime. The JDBC URL should look like:
jdbc:h2:mem:test;DB_CLOSE_DELAY=-1;INIT=runscript from 'classpath:/db.sql'We need to create a method to fetch these data from the database:
public static List<Employee> fetchData() throws SQLException {
    String SQL_QUERY = "select * from emp";
    List<Employee> employees = null;
    try (Connection con = DataSource.getConnection();
        PreparedStatement pst = con.prepareStatement( SQL_QUERY );
        ResultSet rs = pst.executeQuery();) {
            employees = new ArrayList<>();
            Employee employee;
            while ( rs.next() ) {
                employee = new Employee();
                employee.setEmpNo( rs.getInt( "empno" ) );
                employee.setEname( rs.getString( "ename" ) );
                employee.setJob( rs.getString( "job" ) );
                employee.setMgr( rs.getInt( "mgr" ) );
                employee.setHiredate( rs.getDate( "hiredate" ) );
                employee.setSal( rs.getInt( "sal" ) );
                employee.setComm( rs.getInt( "comm" ) );
                employee.setDeptno( rs.getInt( "deptno" ) );
                employees.add( employee );
            }
    }
    return employees;
}
Now, we can need to create a JUnit method to test it. Since we know the number of rows in the table emp, we can expect that the size of the returned list should be equal to the number of rows:
@Test
public void givenConnection_thenFetchDbData() throws SQLException {
    HikariCPDemo.fetchData();

    assertEquals( 4, employees.size() );
}
5. Conclusion
As always, the full source code is available over on GitHub.